 martinberger.swiss
Oracle AI Database 26ai is finally available for Linux x86-64 systems - many of us have been waiting a long time for. Even better, the latest Oracle AutoUpgrade release fully supports 26ai.
In this post, I provide a short step-by-step guide to install and configure Oracle Database 26ai (23.26.1.0.0) on an Oracle Linux 9.5 machine with internet access supported by Oracle AutoUpgrade.
As Oracle PM Daniel Overby-Hansen already mentioned in his blog post how to be ready for 26ai, 26ai for Linux x86-64 is delivered as a Golden Image.
Section 1: Prerequisites
- Oracle Linux 9.5 is up and running, and memory, disk, and CPU resources are sufficient.
- An existing Java setup is available - either from a previous Oracle installation or through OpenJDK. If Java is not avilable:
sudo dnf install -y java-11-openjdk java-11-openjdk-devel
- The Oracle preinstall package has been executed to create required users and set OS parameters.
$ sudo dnf install -y oracle-database-preinstall-23ai
I created the following directories to store the installation software and to prepare the Oracle RDBMS environment. Owner must be oracle.
$ sudo mkdir -p /u01/app/oracle
$ sudo mkdir -p /u01/app/oraInventory
$ sudo mkdir -p /u01/app/oracle/stage/autoupgrade
$ sudo mkdir -p /u01/app/oracle/stage/autoupgrade/logs
$ sudo mkdir -p /u01/app/oracle/stage/autoupgrade/keystore
$ sudo mkdir -p /u01/app/oracle/stage/autoupgrade/patches
$ sudo mkdir -p /u01/app/oracle/product/23.0.0/dbhome_1

$ sudo chown -R oracle:oinstall /u01/app/oracle
$ sudo chown -R oracle:oinstall /u01/app/oraInventory
Create additional these directories if you want to create a new database immediately after binary installation. I use OMF in my example.
$ sudo mkdir /u02/oradata
$ sudo mkdir /u03/fast_recovery_area

$ sudo chown -R oracle:oinstall /u02/oradata
$ sudo chown -R oracle:oinstall /u03/fast_recovery_area
Section 2: Configure Oracle AutoUpgrade for Software Download
You can download the latest Oracle AutoUpgrade release directly into your directory. Download AutoUpgrade Oracle direct-link: https://download.oracle.com/otn-pub/otn_software/autoupgrade.jar.
$ cd /u01/app/oracle/stage/autoupgrade

$ wget -O /u01/app/oracle/stage/autoupgrade/autoupgrade.jar \
  https://download.oracle.com/otn-pub/otn_software/autoupgrade.jar
The file should be owned by the oracle user. All installation and setup steps (except running root.sh when user does not have sudo permissions) are executed under this user.
$ cd /u01/app/oracle/stage/autoupgrade
$ ls -la *.jar
-rw-r--r--. 1 oracle oinstall 6729677 Jan 25 14:43 autoupgrade.jar
Verify that AutoUpgrade is working by checking its version:
$ java -jar autoupgrade.jar -version
build.version 25.6.251016
build.date 2025/10/16 00:04:36 +0000
build.hash 54a1e2442
build.hash_date 2025/10/15 21:11:40 +0000
build.supported_target_versions 12.2,18,19,21,23
build.type production
build.label (HEAD, tag: v25.6, origin/stable_devel, stable_devel)
build.MOS_NOTE 2485457.1
build.MOS_LINK https://support.oracle.com/epmos/faces/DocumentDisplay?id=2485457.1
Section 3: Configure Autopgrade for My Oracle Support
Create the minimal configuration file. Note: the version is 23!
# download.cfg
global.global_log_dir=/u01/app/oracle/stage/autoupgrade/log
global.keystore=/u01/app/oracle/stage/autoupgrade/keystore

patch1.folder=/u01/app/oracle/stage/autoupgrade/patch
patch1.patch=RU,DPBP,OPATCH
patch1.target_version=23
Now run the command to configure My Oracle Support credentials. During this step, AutoUpgrade will prompt you to create and confirm a keystore password.
$ java -jar autoupgrade.jar -config download.cfg -patch -load_password
At the MOS> prompt, add your credentials. Save the credentials and enable auto-login (default setting).
MOS> add -user <your-mos-login-username - e.g. homer.simpson@jurasuedfuss.com>
Enter your secret/Password:
Re-enter your secret/Password:
MOS> save
Convert the AutoUpgrade Patching keystore to auto-login [YES|NO] ? yes
MOS> exit

AutoUpgrade Patching Password Loader finished - Exiting AutoUpgrade Patching
Your keys are stored in the keystore subdirectory defined in configuration file:
$ $ cd /u01/app/oracle/stage/autoupgrade/keystore

$ ls -la
total 8
drwxr-xr-x. 2 oracle oinstall  90 Jan 25 16:59 .
drwxr-xr-x. 5 oracle oinstall 114 Jan 25 16:56 ..
-rw-------. 1 oracle oinstall 541 Jan 25 16:59 cwallet.sso
-rw-------. 1 oracle oinstall   0 Jan 25 16:59 cwallet.sso.lck
-rw-------. 1 oracle oinstall 429 Jan 25 16:59 ewallet.p12
-rw-------. 1 oracle oinstall   0 Jan 25 16:59 ewallet.p12.lck
Section 4: Download Oracle AI Database 26ai Software
Download the Oracle database software using the configuration file you prepared earlier. AutoUpgrade will read the entries and fetch the required media automatically.
$ java -jar autoupgrade.jar -config download.cfg -patch -mode download
Based on the configuration file, three files are now available in /patch subdirectory.
| Patch | Description |
|---|---|
| p38743961 | DATABASE RELEASE UPDATE 23.26.1.0.0 (GOLD IMAGE) |
| p38842609 | DATAPUMP BUNDLE PATCH 23.26.1.0.0 |
| p6880880 | OPatch 12.2.0.1.49 for DB 23.0.0.0.0 (Jan 2026) |
Example output:
$ java -jar autoupgrade.jar -config download.cfg -patch -mode download
AutoUpgrade Patching 25.6.251016 launched with default internal options
Processing config file ...
Loading AutoUpgrade Patching keystore
AutoUpgrade Patching keystore is loaded

Connected to MOS - Searching for specified patches

------------------------------------------------------------
Downloading files to /u01/app/oracle/stage/autoupgrade/patch
------------------------------------------------------------
DATABASE RELEASE UPDATE 23.26.1.0.0 (GOLD IMAGE)
    File: p38743961_230000_Linux-x86-64.zip - VALIDATED

DATAPUMP BUNDLE PATCH 23.26.1.0.0
    File: p38842609_2326100DBRU_Generic.zip - VALIDATED

OPatch 12.2.0.1.49 for DB 23.0.0.0.0 (Jan 2026)
    File: p6880880_230000_Linux-x86-64.zip - VALIDATED
------------------------------------------------------------
Section 5: Create a new ORACLE_HOME
Next, create a separate AutoUpgrade configuration file for installing the Oracle software in a new ORACLE_HOME. AutoUpgrade will automatically create the directory if it does not already exist. If it already exists, it must be empty. If you have existing ORACLE_HOME installations, adapt the target_home variable.
Note: Target version is 23.
# install.cfg
global.global_log_dir=/u01/app/oracle/stage/autoupgrade/log
install1.patch=RU,DPBP,OPATCH
install1.target_version=23

install1.target_home=/u01/app/oracle/product/23.0.0/dbhome_1
install1.folder=/u01/app/oracle/stage/autoupgrade/patch
install1.home_settings.oracle_base=/u01/app/oracle
install1.home_settings.edition=EE
install1.home_settings.inventory_location=/u01/app/oraInventory
install1.download=no
Start the AutoUpgrade job with the command below. It will use your installation configuration file and create the new ORACLE_HOME as defined.
$ java -jar autoupgrade.jar -config install.cfg -patch -mode create_home
You can follow console actions by append command lsj-a.
patch> lsj -a
patch> +----+-------------+-------+---------+-------+----------+-------+----------------------+
|Job#|      DB_NAME|  STAGE|OPERATION| STATUS|START_TIME|UPDATED|               MESSAGE|
+----+-------------+-------+---------+-------+----------+-------+----------------------+
| 100|create_home_1|INSTALL|EXECUTING|RUNNING|  21:00:00|55s ago|Installing ORACLE_HOME|
+----+-------------+-------+---------+-------+----------+-------+----------------------+
Total jobs 1

The command lsj is running every 7 seconds. PRESS ENTER TO EXIT
<REDACTED>
<REDACTED>
<REDACTED>
AutoUpgrade will run for a few minutes. When prompted, execute root.sh to finalize the binary installation - this step is required only, if your user (in this example, oracle) does not have sudo privileges to run root-level commands.
Example output for a fresh 26ai installation:
The command lsj is running every 7 seconds. PRESS ENTER TO EXIT
Job 100 completed
------------------- Final Summary --------------------
Number of databases            [ 1 ]

Jobs finished                  [1]
Jobs failed                    [0]
Jobs restored                  [0]
Jobs pending                   [0]

# Run the root.sh script as root for the following jobs:
For create_home_1 -> /u01/app/oracle/product/26.0.0/dbhome_1/root.sh

# Run the orainstRoot.sh script as root for the following jobs:
For create_home_1 -> /u01/app/oraInventory/orainstRoot.sh

Please check the summary report at:
/u01/app/oracle/stage/autoupgrade/log/cfgtoollogs/patch/auto/status/status.html
/u01/app/oracle/stage/autoupgrade/log/cfgtoollogs/patch/auto/status/status.log
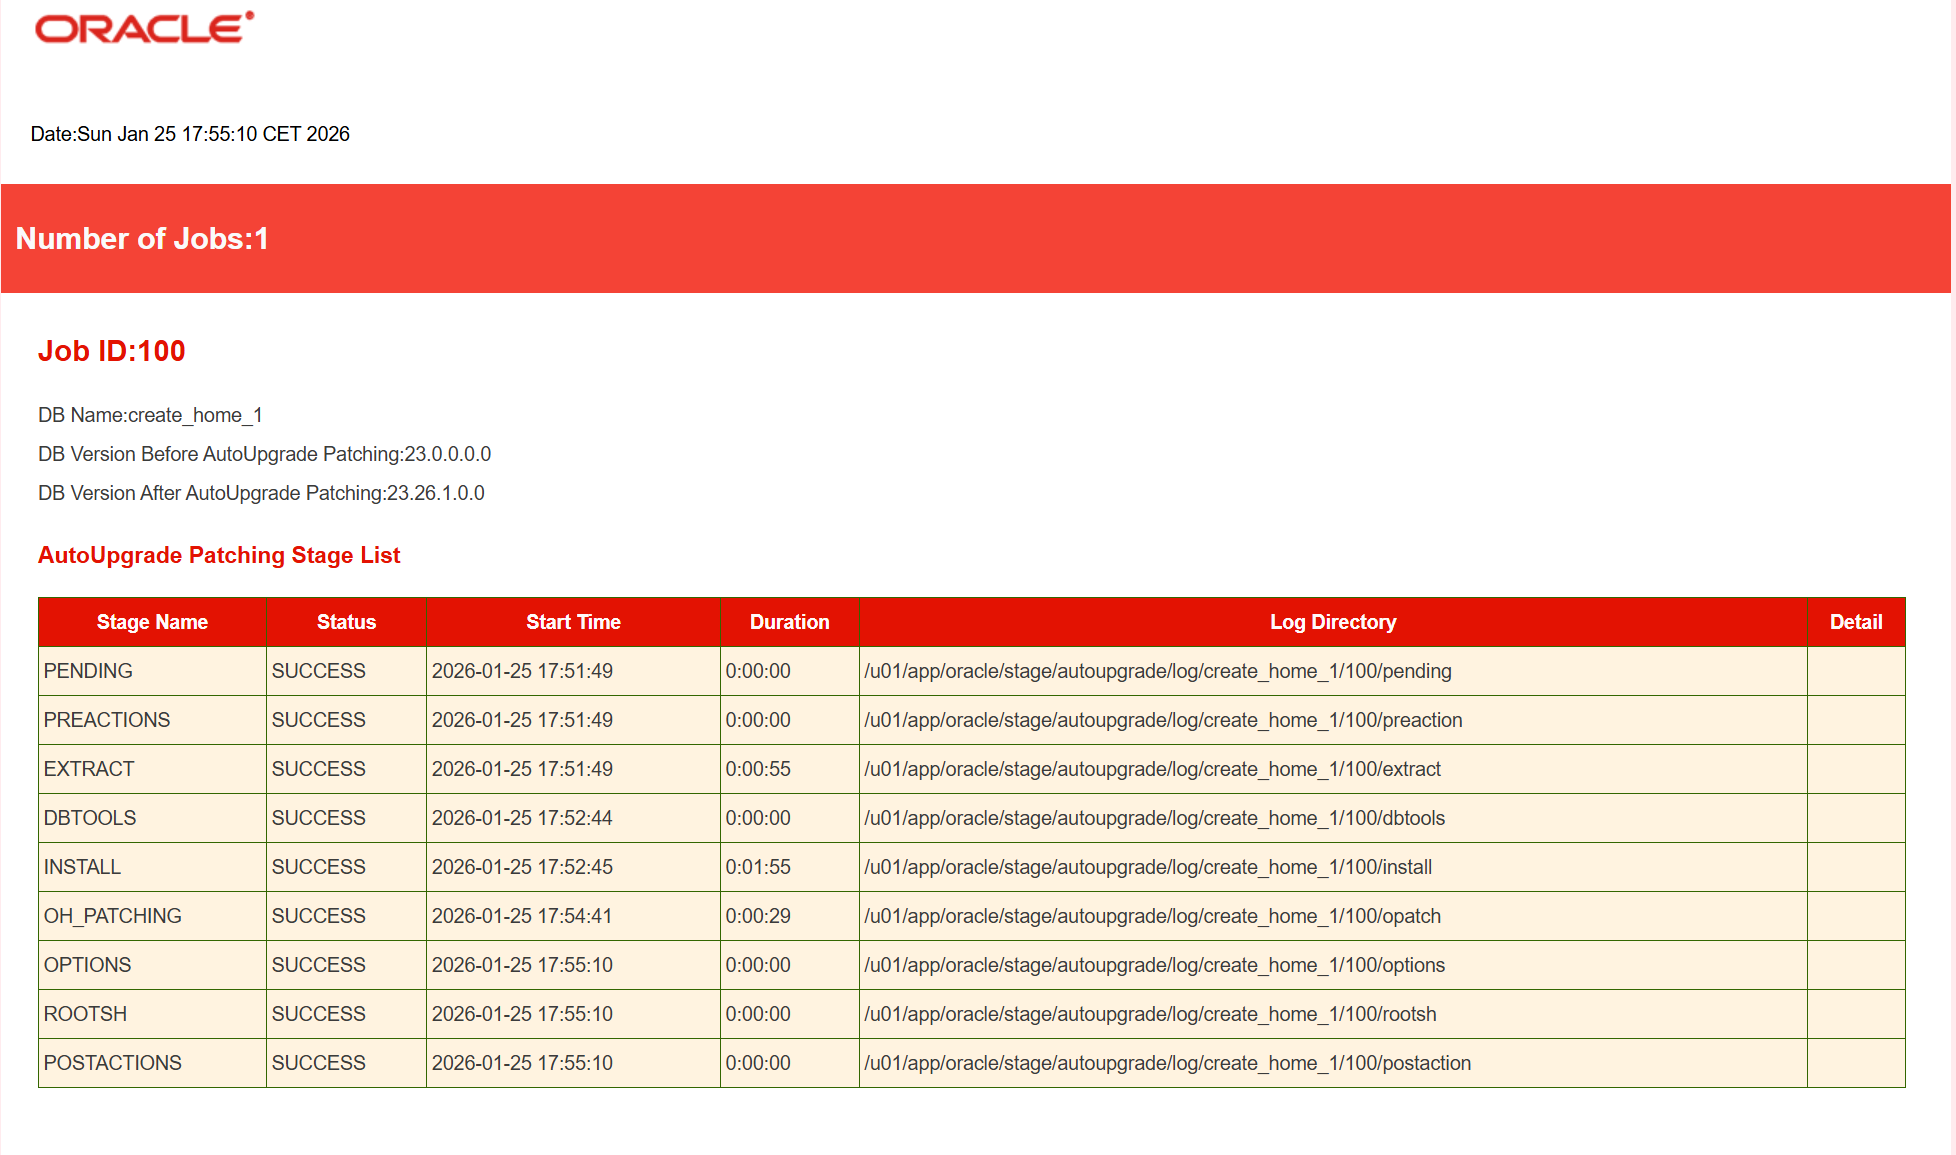
The status details are available in both the AutoUpgrade status log and the generated HTML report, which provide a clear summary of the job results.
Section 6: Create a new Database
I run DBCA in silent mode as the oracle user to create a new database. Remember that DBCA does not automatically apply environment‑specific settings such as TNS_ADMIN, backup locations, or networking configuration must be configured separately.
$ cd /u01/app/oracle/product/26.0.0/dbhome_1/bin

$ ./dbca -silent -createDatabase \
-templateName General_Purpose.dbc \
-gdbname NODATA.internal -sid NODATA -responseFile NO_VALUE \
-characterSet AL32UTF8 \
-sysPassword OraWelcome1 \
-systemPassword OraWelcome2 \
-createAsContainerDatabase true \
-numberOfPDBs 3 \
-pdbName pdbnodata0 \
-pdbAdminPassword OraWelcome3 \
-databaseType MULTIPURPOSE \
-automaticMemoryManagement false \
-totalMemory 3072 \
-storageType FS \
-datafileDestination /u02/oradata/ \
-recoveryAreaDestination /u03/fast_recovery_area \
-recoveryAreaSize 1200  \
-redoLogFileSize 200 \
-ignorePreReqs \
-enableArchive TRUE \
-useOMF true
Once DBCA finishes - typically after a few minutes - the new database instance is fully operational. If your system is still using a 19c listener, the 26ai database will automatically register with it, as dynamic registration works across these Oracle Database release levels.
Database creation complete. For details check the logfiles at:
 /u01/app/oracle/cfgtoollogs/dbca/NODATA.
Database Information:
Global Database Name:NODATA.internal
System Identifier(SID):NODATA
Look at the log file "/u01/app/oracle/cfgtoollogs/dbca/NODATA/NODATA.log" for further details.
Section 7: Verification
Version Check
To verify that the 26ai installation is working correctly, switch to the new environment using oraenv and connect to the database with SQL*Plus. The banner confirms the exact Oracle AI Database 26ai release and that the instance is functional:
$ . oraenv
ORACLE_SID = [oracle] ? NODATA
The Oracle base has been set to /u01/app/oracle
$ sqlplus / as sysdba

SQL*Plus: Release 23.26.1.0.0 - Production on Sun Jan 25 19:52:59 2026
Version 23.26.1.0.0

Copyright (c) 1982, 2025, Oracle.  All rights reserved.


Connected to:
Oracle AI Database 26ai Enterprise Edition Release 23.26.1.0.0 - Production
Version 23.26.1.0.0

SQL>
A new 26ai Feature - The boolean data type:
SQL> CREATE TABLE bool_test (
  2       id       NUMBER,
  3       is_valid BOOLEAN
  4  );

Table created.

SQL> INSERT INTO bool_test VALUES (1, TRUE);

1 row created.

SQL> INSERT INTO bool_test VALUES (2, FALSE);

1 row created.

SQL> INSERT INTO bool_test VALUES (3, UNKNOWN);

1 row created.

SQL> SELECT id, is_valid
  2  FROM bool_test
  3  WHERE is_valid IS TRUE;

        ID IS_VALID
---------- -----------
         1 TRUE
Section 8: Summary
This guide shows how effortlessly Oracle AutoUpgrade can provision new Oracle AI Database 26ai installations on Oracle Linux 9.5. With just a small configuration file, AutoUpgrade downloads the 26ai Golden Image, builds a fresh ORACLE_HOME, and prepares the environment automatically. Creating new 26ai database instances becomes a simple, repeatable, fully automated workflow. A final SQL*Plus check confirms the installation and demonstrates the new BOOLEAN SQL data type.